What is Resolume?
Resolume is an application designed for mixing videos and is one the programs commonly used to create visuals at nightclubs and festivals. Developed in The Netherlands, Resolume is currently on version 4 and comes in two configurations: Avenue and Arena. For the purposes of this video, and most likely all future videos, we will be focusing on Resolume Avenue. Both configurations share a set of core features with additional capabilities found in Arena for more advanced control of projection, lighting, systems, and timecode.
Resolume is not restricted to only mixing video. You can add in still images, audio, and even generate your own motion graphics using the built-in effects. In many ways, Resolume shares the same underlying functions that you would find in a DJ software like Traktor Pro 2 or Cross DJ. Mixer controls feature faders for individual layers as well as a crossfader. Software controls can be mapped to MIDI controllers. Video clips can be synced to a Resolume’s internal master clock or an external MIDI input. You can use audio to animate effect parameters.
Where can I get Resolume?
Both Resolume Avenue and Arena are available exclusively at resolume.com. Pricing for Resolume Avenue starts at €299 and Arena at €699. Don’t let the high price turn you away, as the software is availble to download for free. Unlike the trial version of some software applications, the demo version of Resolume is fully featured. There are only 2 “limitations” to using the software without purchasing it. The first is a Resolume logo watermark that sits on top of the video output. You wouldn’t want this to show up on a large LED wall behind a DJ booth, but if you’re using this for professional gigs, you should buy a license. Thankfully the logo is not too much of a distraction if you want to test out the software at home or even use it for a small gathering of friends. The second limitation is a robotic voice that says “Resolume Avenue 4” at random intervals. This is only a concern if you intend to mix both videos and audio in the software and is irrelevant if you only want to mix videos.
One difference between Resolume and DJ software that only mixes audio is the hardware requirements. Mixing video requires more processing power than audio especially once you add multiple layers of videos and effects. It may be tempting to run Resolume alongside Traktor Pro 2 or Ableton Live, but I would advise against it. My 2007 Macbook Pro has no problem running Resolume by itself, but doesn’t perform well when additional applications are running in the background. If you have a newer computer with better hardware, you may have an easier time running multiple applications than I do.
Understanding the interface
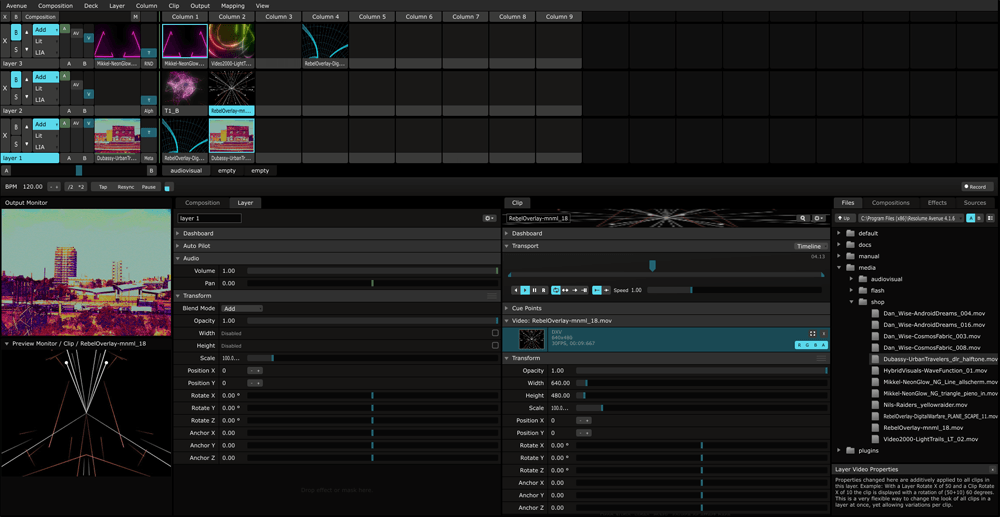
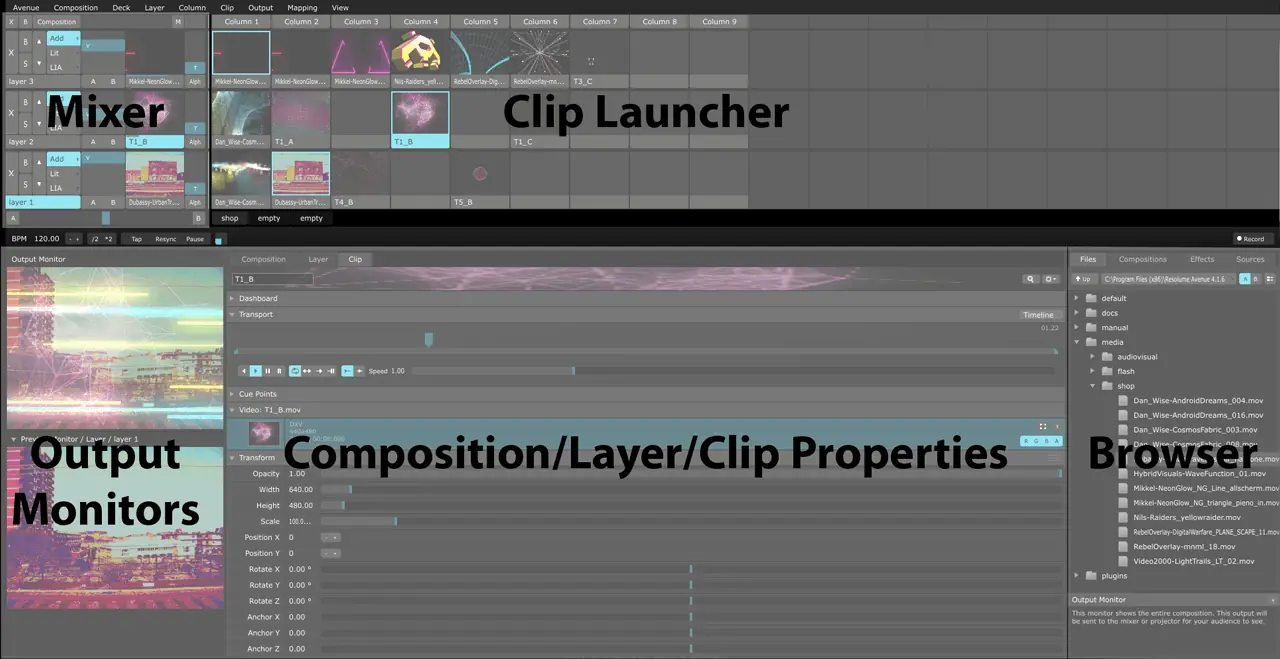
The Resolume software interface may seem complicated at first, but is actually quite simple. It can be divided into 5 distinct sections. Let’s take a look at them one by one.
Browser
The Browser is similar to the Finder in Mac OSX or Explorer in Windows. There are 4 different Browser tabs: Files, Compositions, Effects, and Sources. Files presents the files on your computer in a tree view. Use this tab to navigate to the folder(s) containing your media files and drag them into slots in the Clip Launcher. Alternatively, you can drag and drop files directly from the Finder/Explorer into slots in Resolume’s Clip Launcher. Compositions lists your saved projects and the decks within those projects. Each composition displays its resolution setting and the number of decks saved inside it.
Effects listed all the effects that you have available to use. The effects are separated into video and audio plugins. There are a ton of great built-in effects to use by simply dragging and dropping them onto a clip, layer, or the entire composition. You can also add your own VST or FFGL effect plugins. Sources lists non-file based media. This includes connected video cameras and generated graphics. Drag and drop any of them to an empty slot in the clip launcher to use them in your composition.
Output Monitors
The Output Monitors are two displays that aid you in your video mixes. The top is what is being displayed to your external display. You could think of this as the master output on a DJ mixer. The bottom is a preview monitor. Click on the name of any item in the Clip Launcher to view it in this monitor before mixing it. This is like using the Cue function on a DJ mixer.
Clip Launcher
The Clip Launcher serves 2 purposes. The first is to hold all of the media that you wish to use during your mix. The second is to trigger those clips to play. The position of clips in the Clip Launcher is important. Clips on the same horizontal axis will be displayed in the same layer. Clips on the same vertical axis are stored in the same column. You can trigger all of the clips in a column by clicking on the column name above the top layer of clips.
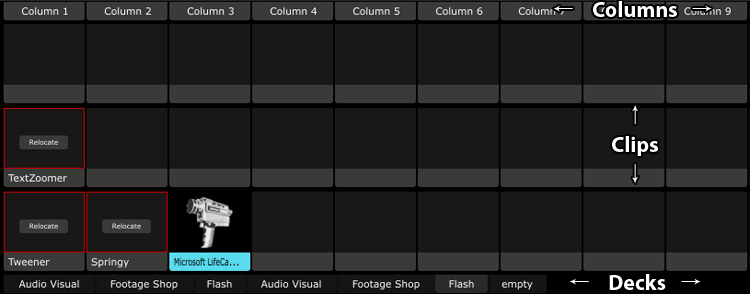
You can organize your clips into decks. You can switch between decks, add additional decks, and remove decks at any time. The decks selection button are located just below the clips located in the bottom layer. Resolume Avenue 4 comes with a few example decks that contain sample media files.
Composition/Layer/Clip Properties
The Properties section contains the settings for each clip and layer in the composition, as well as the composition as a whole. There are a default set of properties automatically assigned to each composition element including but not limited to position, rotation, and opacity. This section is where you will be controlling all of the effects and generated graphics that you use in your video mixes.
Mixer
The mixer in Resolume Avenue 4 features the same kinds of controls that you would find in the mixer section of any DJ software. The difference of course is that Resolume Avenue 4’s mixer includes video controls. Each layer has a fader labelled V. This is the most important control for mixing video as it adjusts the video opacity. When a layer’s V fader is all the way at the bottom its opacity is at 0% resulting in the video being completely hidden. As you bring the V fader up you will increase the opacity from 0 to 100%. When the opacity fader is at 100% you will not be able to see the clips in layers beneath it.
Remember that mixing videos is unlike mixing just audio. You can mix multiple sources of audio with their volume faders at 100% and hear both of them. It is as if those audio sources are side by side horizontally. Mixing video is layer based and should be thought of as a vertical stack. Media on the top of the stack can only display what is beneath it if its opacity is below 100%.
The most basic of basic video mixes
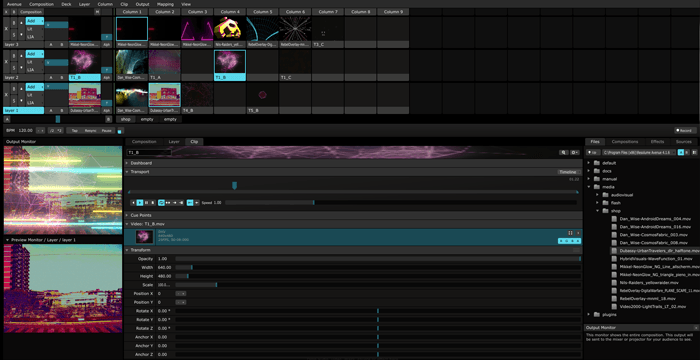
This is by no means an extensive primer on all things video mixing. The goal here is to get you familiar with the controls of the software and start having fun as quickly as possible. I would suggest that you start by using the media files that are included with your installation of Resolume Avenue 4. If you have a webcam, you can also use it as a video source and add fun effects to it. Set your mixer settings to match the screenshot below before you start your first mix. Notice that the opacity of Layer 1 is at 100%. Layers 2 and 3 are set to 0% opacity.
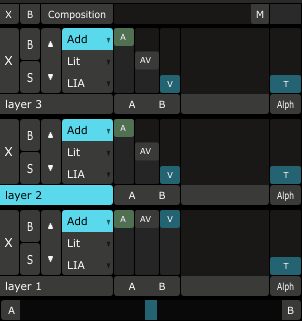
Start your mix by dragging 3 sample clips into Column 1 of the clip launcher. Then click on Column 1 to trigger all three clips in the column at once. The only clip that will be visible in the output monitor will be the one in Layer 1. Next bring up the V fader to roughly 50% for Layer 2 and then Layer 3. You should now see all three clips on top of each other.
Adding effects
Video effects can transform clips into something entirely new. Resolume Avenue 4 has a large array of built-in effects and presets. To use an effect drag and drop it from the effects section of the browser onto a clip in the clip launcher, a layer in the mixer, or the composition as a whole.I would suggest starting with some of the presets like the Shimmer preset for the Goo effect. This will make your video ripple like waves on a body of water.
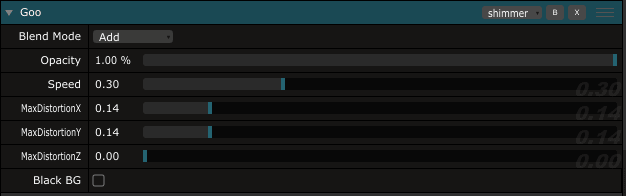
The effect control panels are located in composition/layer/clip properties. You can mess about with the various parameter sliders to get a sense of how the effect controls affect the video output. There are 3 additional effect controls located on the effect title bar that are very important. The first is a dropdown menu. This allows you to switch between save, and rename presets. Not all of the built-in effects have presets, but many of them do, so do not be alarmed if this menu does not contain any presets. The second control is a button labeled B. This button will bypass the effect and is essentially an on/off switch. Finally, the third control is labeled X. This will remove the effect from the composition, layer, or clip.
Use transitions to go from clip to clip in the same layer
We have covered the concept of stacking layers on top of each other, but have not looked at changing the clip in a layer. Remember that clips placed on the same horizontal axis will replace each other in the same layer. Grab a few more sample media files and drag them into Column 2 Click on one of the clips in Column 2 and notice that the clip in the layer you clicked on switches immediately. To add a transition between the two clips you can adjust the T fader to the right side of the mixer. This fader does not act as a crossfader between clips. All it does it adjust the length of the transition between 1-10 seconds. Adjust the T fader on Layer 1 to ~50% of the way to the top and click on the clip in Column 2. The clips should now fade from one to another instead of jumping from one to the other.
Fading between clips is cool, but would not be very exciting if you used it every time that you triggered a new clip. Thankfully there are a ton of built in transitions to choose from. Just below the T fader is a button that by default says Alph. Click on this button to open the transitions dropdown menu. Some of my favorites are Displace, LoRez, and Meta Mix. You can even set it to use a random transition each time if you’re feeling lucky.
Where do we go from here?
This tutorial only scratches the surface of what you can do with Resolume Avenue 4. However, you should have enough of a grasp of the basics to start having fun and experimenting with the application. We will be sure to go over many of the concepts in this tutorial in the future as we focus on individual software functions. Please leave a comment below if you have any specific requests for future tutorials on Resolume Avenue 4.